Ambrogio Robot Lawn Mower: How to Cross a Driveway and How to Navigate an Extremely Narrow Corridor
As an Ambrogio robot lawn mower installation expert, I am often asked how to cross the driveway and how to navigate an extremely narrow corridor with the robot lawn mower. One of the tricky things when learning how to cross driveways is to also ensure the robot does not mow on the driveway or get stuck on the driveway. The same is true when learning how to navigate extremely narrow corridors.
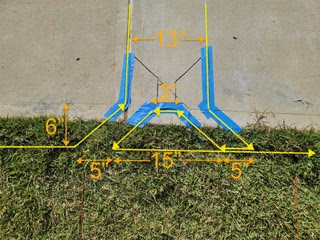
The above wiring was tested extensively by the customer so it is an excellent solution. He had a funny name for it, because you can think of the corridor opening as a "throat" and the wiring as a "lozenge". Thanks, Mike, for the experimentation and for the solution to share.
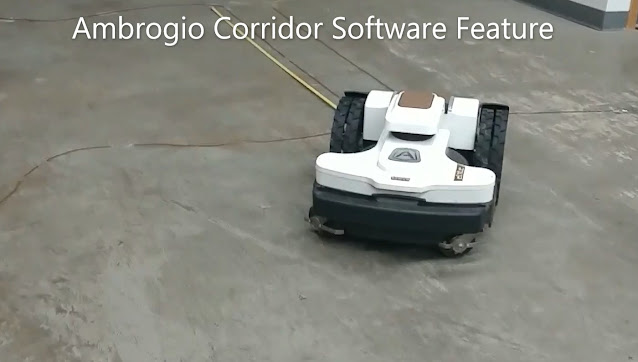
The Corridor Software Feature activates automatically when the robot goes into a narrow corridor while mowing. The robot stays on the wire for a distance programmed in the service menu (the Max Follow Wire parameter). The default distance is 13mt/43 feet. If the corridor is longer than the default distance, it will be necessary to contact your dealer to change the parameter in the service menu.
I used the Corridor Software Feature to regularly mow a narrow strip behind a building because I envisioned the robot would not find the area often enough randomly. Learn more in my blog post about a difficult Ambrogio installation and watch the installation video.
Ambrogio Robot Lawn Mower - How to Cross a Driveway (Video)
A medium-sized Ambrogio robot model is used. Two small mowing areas are created with a long corridor between them. A demonstration is performed that shows how the robot lawn mower will drive on top of the corridor wire automatically when it encounters the wire while mowing (working). Then, the wire shape is changed and it is shown how the robot cannot drive on top of the wire because the wire stops it.
The topics covered in the video are: 1) Corridor Software Feature - Introduction 2) Max Follow Wire Service Menu Parameter 3) Corridor Software feature demonstration 4) How to defeat the Corridor Software Feature with a wire shape.
I used one of the medium-sized robot lawn mower models to demonstrate that these larger-sized robot lawn mowers maneuver very well in small spaces.
Corridor Software Feature Wiring Specifications
There is a minimum length and a width range to ensure the corridor software feature activates. The length is 6 ft 6 inches/2mt. The width range is 10-12"/26-30cm. The length is a minimum. There is no maximum length because the corridor feature will continue to activate until the robot lawn mower exits the corridor.
The width of the corridor generally must be 10-12"/26-30cm. This is important because "out of border" errors will occur if the wires are placed more than 12"/30cm apart but less than 28"/70cm apart. I call it "no man's land". Don't try it, it won't work.
When the corridor feature was defeated, the distance tested between the two wires was 2.5"/6cm. It was a brief test, though. In practice this distance may need to be increased slightly. The distance and arc radius measurements in the video are illustrated here:
While the wire was layed out, I tested a small model, the Twenty Elite, and the corridor software feature activated. Since the Twenty Elite is only 9" wide, it might be beneficial to place the two wires closer. I would be interested to hear from readers who tried a different distance. The main consideration is that if the robot navigates in both directions, the wires need to be far enough apart that its maneuvers do not cause it to jump to the wrong wire because it will maneuver and get an "out of border" error.
After making the video, a customer informed me of an issue he was having while trying to get the corridor defeat to work. The robot was interpreting the corridor defeat shape as a false rapid return. It drove a few feet further and made a hard right turn, right in the middle of his driveway. Oops. This is the shape he used that didn't work:
With some trial and error, the configuration below proved to work with a 4.0 Basic robot and a corridor width of 13".
 |
| Successful Corridor Defeat Wiring Configuration |
The above wiring was tested extensively by the customer so it is an excellent solution. He had a funny name for it, because you can think of the corridor opening as a "throat" and the wiring as a "lozenge". Thanks, Mike, for the experimentation and for the solution to share.
The above dimensions may need to be modified somewhat for different corridor widths and for different robot models. But the concept is sound and has been proven to work, which trumps theory all day long, in my opinion. I would love to hear from any readers that implement a "lozenge" on a driveway crossing or corridor that has a different width.
I propose that the 4.36 and 350i robots should have the two wires at 12", that's why the dimensions are shown as 10"/12". 10" is certainly fine for 4.0 Elite since it works with 4.0 Basic. 10" has also proven to work with 250i and small robots like L15 and L20.
How to Cut a Groove for a Robot Lawn Mower Driveway Crossing
The video shows a case where the driveway crossing is precisely 10 inches wide. For concrete driveways, an expansion joint can be used to lay one of the wires. The other wire can be laid in a shallow groove created with a circular saw. An asphalt driveway requires two grooves to be cut.
Secure the wire tightly at both ends with pegs. Once the installation is fully tested the wire can be covered with caulk to insure it does not come out of the groove.
Sometimes a customer does not want to create a groove in the driveway. This is understandable and can be dealt with a different way. For a concrete driveway, two expansion joints can be used. For an asphalt driveway, usually there is a crack near the house and another crack near the sidewalk or near the street. When the two wires are placed so far apart, the robot will "mow" the driveway, which is undesirable. The way to keep this from happening is to add "driveway gates". Driveway gates are loops of wire that are staked or buried alongside the driveway to create a barrier so the robot does not "mow" the driveway. The details and drawings for driveway gates are included in my installation guide, available for purchase on Amazon here: Ambrogio Installation
How to Install Ambrogio Robot Lawn Mowers Guide
My guide is an essential aid for anyone learning to install Ambrogio robot lawn mowers. It contains details that are not easily found elsewhere. Many of the concepts in my guide are applicable to other brands, too. To use my guide with other brands, modify the following parameters:
- Wire-to-wire distance while navigating
- Wire-to-wire distance while mowing
- Straight wire required before or after recall on-wire antennas
- Wire distances from objects and mulch considering the physical aspects and movements of the other brand (or follow the manufacturer's instructions carefully)
Order my Ambrogio Installation Guide on Amazon or find the PDF version of my Ambrogio Installation Guide for sale on our web site. When you order the PDF version from our site, you receive some "bonus" information:
- "Getting Started with the Ambrogio Remote App" for iOS
- Installation Quick Start Guide
- Air Marker tech note
- Zone Gate tech note
The above items will be incorporated into the guide paperback at the next update. Anyone who purchases the current version can receive the updated PDF update (when it becomes available) by providing proof of purchase.
We've had several new dealers join us, the most recent is Wayne Lawn and Garden in Canton, Michigan. Wondering how you can sell or install these amazing machines? Contact us now!


This comment has been removed by the author.
ReplyDeleteThis comment has been removed by the author.
ReplyDeleteWow. Thanks for posting this great blog post about lawn mowers. Lawn mower helps to cut the grass and reduce the physical work. Buy Lawn Mower Online Australia As they have great variety of lawn mower like
ReplyDeleteMoeBot S5 and S10
Thanks for sharing this great article about robotic lawn mowers. I really enjoy reading your article.
ReplyDeleteGood information thank for shear and you can see our blog https://www.swimmingvac.com/best-pool-vacuum-algae
ReplyDelete